With it easy to use go routines, you have unbridled power to harness concurrency in your programs. However, Go is not spared from race conditions. We still have to use mutex and atomic constructs to ensure that shared variables and their state are correct when read/write by go routines. The aim of this article is to see what could go wrong if you are not careful and how to avoid race conditions in your code.
Let’s create a simple program to demonstrate a shared variable.
package mutexAtomicExample import ( "fmt" "sync" "sync/atomic" ) funcIncrement() { var count int var wg sync.WaitGroup //needed so that the function don't //exit prematurely relative //to all go routines for i := 0; i < 100000; i++ { wg.Add(1) gofunc() { defer wg.Done() count++ }() } wg.Wait() fmt.Printf("count: %v for 100000 cycles\n", count) }
In the increment function above, we use create 100,000 go routines where each of these will increment the count variable. We use a waitgroup to ensure the main program stays blocked [at the wg.Wait() line] until all the go routines have the chance to run till completion.
Surprisingly, the output is as follows if we run the increment function.
1
count: 98152for100000 cycles
What gives?? Turns out that despite the waitgroup, the increment count operations carried out by each go routine may not be successful. The increment operation is not atomic, meaning that it could be interrupted midway by another go routine that is working concurrently to increment the same count variable. Hence, you won’t have count that will reach 100,000 but less than that. At the high level, this is a race condition.
Two ways to handle — Mutex and Atomic Construct
In the first way, we use mutex to lock the shared variable such that only one go routine can increment the count at a time.
1 2 3 4 5 6 7 8 9 10 11 12 13 14 15 16
funcIncrementMutex() { var count int var wg sync.WaitGroup m := sync.Mutex{} //1 for i := 0; i < 100000; i++ { wg.Add(1) gofunc() { defer wg.Done() m.Lock() defer m.Unlock() count++ }() } wg.Wait() fmt.Printf("count: %v for 100000 cycles with Mutex\n", count) }
In //(1), we create a variable mutex with the sync.Mutex{} structure which will give a zero value mutex. This will by default be an unlocked mutex.
In the go routine, we lock the mutex before the increment of the count and unlock thereafter. And below is the output of running the function.
1
count: 100000for100000 cycles with Mutex
Now, let’s try to use the atomic construct which is available as part of the sync/atomic. Again we create a variant of the increment function:
1 2 3 4 5 6 7 8 9 10 11 12 13
funcIncrementAtomic() { var count int64// sync atomic cannot work with int (1) var wg sync.WaitGroup for i := 0; i < 100000; i++ { wg.Add(1) gofunc() { defer wg.Done() atomic.AddInt64(&count, 1) //(2) }() } wg.Wait() fmt.Printf("count: %v for 100000 cycles with Atomic\n", count) }
Notice in (1), we had to use a int64 instead of the int since the atomic package cannot work with int. We can also use int32. Below are some functions showing the specific integer types that will work. So be sure to check the official documentations before using the sync/atomic package.
func AddInt32(addr *int32, delta int32) (new int32)
func AddInt64(addr *int64, delta int64) (new int64)
func AddUint32(addr *uint32, delta uint32) (new uint32)
func AddUint64(addr *uint64, delta uint64) (new uint64)
func AddUintptr(addr *uintptr, delta uintptr) (new uintptr)
In //(2), we evoke the AddInt64 function which requires the int64 variable as the first parameter and the delta value (also another int64) that we want to add to it.
A pointer is a special type that is used to reference a value. Understanding it better can help you write advanced code in Go.
Variables
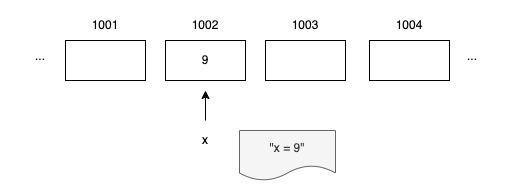
Computer memory can be thought of as a sequence of boxes, placed one after another in a line. Each box is labeled with a unique number, which increments sequentially. The unique location number is called a memory address.
A variable is just a convenient, alphanumeric nickname for a piece of memory location assigned by the compiler. When you declare variables, you are given a memory location to use from the free memory available.
Pointers
A pointer value is the address of a variable. A pointer is thus the location at which a value is stored. With a pointer, we can read or update the value of a variable indirectly, without using or even knowing the variable’s name, if indeed it has a name.
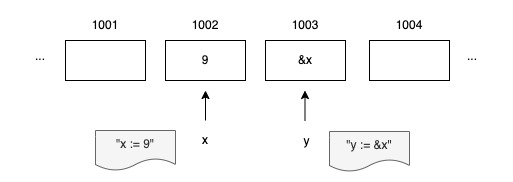
In the following example,
The statement &x yields a pointer to an integer variable.
y := &x We say y points to x, or y contains the address of x.
The expression *y yields the value of that integer variable, which is 9 here.
Why is pointer useful?
“Pointers are used for efficiency because everything in Go is passed by value so they let us pass an address where data is held instead of passing the data’s value, to avoid unintentionally changing data, and so we can access an actual value in another function and not just a copy of it when we want to mutate it.”
Pointers Example
A copy of the value is sent to a function as an argument in pass-by-value. Any changes in the function will only impact the function’s variable; it will not update the original value outside of the function scope.
In concurrent programming with Golang, the context package is a powerful tool to manage operations like timeouts, cancelation, deadlines, etc.
Among these operations, context with timeout is mainly used when we want to make an external request, such as a network request or a database request. I will show you how to use it to timeout a goroutine in this post.
Here, the WithTimeout takes a parent context and a duration parameter and returns a child context with a deadline set to the specified duration.
The parent context is returned by function Background. It is a non-nil, empty Context and is typically used by the main function as the top-level Context for incoming requests.
2. Long Waiting Function
We define a function that will execute in a separate goroutine. It will send the result to a predefined channel when finished.
We wait for the result from the predefined result or from the timeout context channel in the main function.
The context will automatically signal to the ctxTimeout.Done channel if the timeout is reached. Otherwise, we will receive the result from the ch channel.
1 2 3 4 5 6
select { case <-ctxTimeout.Done(): fmt.Printf("Context cancelled: %v\n", ctxTimeout.Err()) case result := <-ch: fmt.Printf("Received: %s\n", result) }
User Cases
To better understand the context, let’s look at some real-world use cases.
One of the well known advantage of Go is its support of concurrency. Thanks for the goroutine and channel, it makes writing high performance concurrent code become much easier. It is also fun to implement different concurrent patterns. I personally use this pattern a lot in some crawler and downloading resource concurrently, hope it helps!
Let start with a simple go program:
1 2 3 4 5 6 7 8 9 10
// main() not waiting funcmain() { go task() fmt.Println("main exiting...") }
There is a task() function just sleeping for 1 second to simulate a time consuming task. And we want it to run concurrently so add a go keyword in front of the function call to start a goroutine.
1 2
➜ go run main.go main exiting...
As expected, the program will exit immediately because the main function doesn’t wait the goroutine to finish.
To fix it, we can simply add a channel to block the main function:
1 2 3 4 5 6 7 8 9 10 11 12 13 14
// main() waiting through channel funcmain() { ch := make(chanstruct{}) go task(ch)
<-ch // block until receive something fmt.Println("main exiting...") }
We create a non-buffered channel with empty struct{} type (since we just use the channel for signalling, the type doesn’t matters), after starting a goroutine, we immediately get the data from the channel by <-ch , it will block the main() until we can get something from the channel. When the task() finish, it will send an empty struct data to the ch , at the point, the main() can finally get something from the ch and continue to run.
1 2 3
➜ go run main.go task finished! main exiting...
read and write to a non-buffered channel are blocking operations, it can be used to synchronize and communicate with different goroutines. Whereas buffered channel doesn’t block unless the buffer is full.
Beside using a channel, we can also use a WaitGroup to let the main function waits, it may also be more handy if there are multiple goroutines:
What we need to do is quite simple, just declare a sync.WaitGroup variable. When starting a concurrent job, call the wg.Add(1) to increment the counter, when to job is done, call the wg.Done() to decrease the counter. And at the end of main() we need to call wg.Wait() , it will block until the counter become zero.
1 2 3 4 5 6
➜ go run main.go waiting... task 0 finished! task 1 finished! task 2 finished! main exiting...
The things becomes more interesting when we implement a worker pool pattern:
First we declare a buffered int channel pool , then we create a goroutine which will keep fetching the data from the pool and execute the task , this is the worker, if we want multiple workers, we can simply copy the goroutine code multiple times or wrap it with a loop. The worker is ready and blocking because nothing is inside the pool, now we need to feed some jobs to the pool. We can do that by a simple for loop and sending the loop index as a task id to the pool. As soon as the worker can get something from the pool , it will start working. Finally don’t forget to close() the channel if the sender(main) finish their work, otherwise the receiver(worker) will block there forever waiting for the new data comes in the channel and produce a deadlock.
// panic: send on closed channel funcmain() { // create a channel to capture SIGTERM, SIGINT signal quit := make(chan os.Signal, 1) signal.Notify(quit, syscall.SIGTERM, syscall.SIGINT)
var wg sync.WaitGroup pool := make(chanint, 10) id := 1
// create a worker keeps fetching the task and work concurrently gofunc() { for id := range pool { task(id) wg.Done() } }()
// adding task to the pool infinitely gofunc() { for { wg.Add(1) pool <- id fmt.Println("task", id, "added!") id += 1 time.Sleep(time.Millisecond * 500) } }()
To achieve that, we can remove the loop condition to make it infinite loop and wrap it inside a goroutine to make it non blocking. Then we also need a channel with os.Signal type to block the main() . The program will capture SIGTERM, SIGINT and send to the channel by signal.Notify()
1 2 3 4 5 6 7 8 9 10 11 12 13 14
➜ go run main.go task 1 added! task 2 added! task 1 finished! task 3 added! task 4 added! ^Ctask 2 finished! panic: send on closed channel goroutine 34 [running]: main.main.func2() /Users/yk/Project/test/main.go:77 +0x59 created by main.main /Users/yk/Project/test/main.go:74 +0x185 exit status 2
What!? panic…It’s because we close the pool channel after we received the quit signal but the producer goroutine still trying to send the job to the pool channel and panic happens. We also need a way to stop the producer goroutine.
Worker pool graceful shutdown with WaitGroup and Context:
// worker pool graceful shutdown with waitGroup and context funcmain() { // create a channel to capture SIGTERM, SIGINT signal quit := make(chan os.Signal, 1) signal.Notify(quit, syscall.SIGTERM, syscall.SIGINT)
var wg sync.WaitGroup pool := make(chanint, 10) id := 1
// create a worker keeps fetching the task and work concurrently gofunc() { for id := range pool { task(id) wg.Done() } }()
// create a context which listening to SIGTERM, SIGINT ctx, stop := signal.NotifyContext(context.Background(), syscall.SIGTERM, syscall.SIGINT) defer stop()
// adding task to the pool infinitely, break until ctx.Done is closed gofunc() { for { select { case <-ctx.Done(): fmt.Println("stop filling the pool!") close(pool) return default: wg.Add(1) pool <- id fmt.Println("task", id, "added!") id += 1 time.Sleep(time.Millisecond * 500) } } }()
Base on the previous version, we create a context ctx using the signal.NotifyContext() function, it will close the Done channel of the context when the corresponding SIGTERM, SIGINT arrives. In the producer goroutine, instead of a simple for loop, we also need to add a select{} statement. If we receive SIGTERM, SIGINT , it will notify to close the Done channel of the context and enter the case <- ctx.Done(): and exit the goroutine. Otherwise, it will just run the default case to feed jobs to the pool.
1 2 3 4 5 6 7 8 9
➜ go run main.go task 1 added! task 2 added! task 3 added! task 1 finished! ^Cstop filling the pool! task 2 finished! task 3 finished! main exiting...
Now when we send the SIGTERM, SIGINT to the program, it will first stop feeding more jobs to the pool and exit from the producer goroutine, then it waits for the worker goroutine to finsish all the existing task, then exit the main program.
In this article, I will explain how to write your own code to stop go app gracefully
Step 1
make channel which can listen for signals from OS. Refer os.Signal package for more detail. os.Signal package is used to access incoming signals from OS.
1
var gracefulStop = make(chan os.Signal)
Step 2
Use notify method of os.Signal to register system calls. For gracefully stop. we should listen to SIGTERM and SIGINT. signal.Notify method takes two arguments 1. channel 2. constant from syscall.
Now, We needs to create Go routine to listen channel “gracefulStop” for incoming signals. the following Go routine will block until it receives signals from OS. Now, you can perform clean up your stuff it can be closing DB connections, clearing buffered channels, write something to file, etc.. In the following code, I just put wait for 2 seconds. After completing your work you need to send a signal to OS by using os.Exit function. os.Exit function takes integer argument normally, it can be 0 or 1. 0 means clean exit without any error or problem. 1 means exit with an error or some issue. The exit status will help caller to identify the last status when process end.
1 2 3 4 5 6 7
gofunc() { sig := <-gracefulStop fmt.Printf("caught sig: %+v", sig) fmt.Println("Wait for 2 second to finish processing") time.Sleep(2*time.Second) os.Exit(0) }()
Full Source
For the demo, I use simple HTTP server which will display “Server is running” message on the browser.
If you have no critics, you will likely have no success.
Accepting and processing signals from the operating system is important for various use cases in applications.
While many server-side languages have complicated or tedious approaches to processing signals from the OS, with Golang applications it’s extremely intuitive. Golang’s in-built OS package provides an easy way to integrate and react to Unix signals from your Go application. Let’s see how.
The Premise
Let’s say we want to build a Golang application that when requested to shutdown prints a message saying, “Thank you for using Golang.” Let’s set up the main function that basically keeps doing some work until an exit command is provided to the application.
When you run this application and kill it by providing a kill signal from your OS (Ctrl + C or Ctrl + Z, in most cases), you may see an output similar to this one:
1 2 3 4
Doing Work Doing Work Doing Work Process finished with exit code 2
Now, we would like to interpret this kill signal within the Golang application and process it to print out the required exit message.
Receiving Signals
We will create a channel to receive the command from the OS. The OS package provides the Signal interface to handle signals and has OS-specific implementations.
1
killSignal := make(chan os.Signal, 1)
To notify killSignal, we use the Notify function provided by the signal package. The first parameter takes a channel of a os.Signal, while the next parameters accept a list of OS signals we want to notify our channel with.
1
signal.Notify(killSignal, os.Interrupt)
Alternatively, we can notify our signal with specific commands using the syscall package.
In order to process the signal, we’ll make our main function block wait for the interrupt signal using the killSignal channel. On receiving a command from the OS, we’ll print the exit message and kill the application.
In order to process our work loop, let’s move that into a separate goroutine using an anonymous function.
killSignal := make(chan os.Signal, 1) signal.Notify(killSignal, os.Interrupt) gofunc() { for { fmt.Println("Doing Work") time.Sleep(1 * time.Second) } }() <-killSignal fmt.Println("Thanks for using Golang!") }
On running this, it keeps executing the work loop, and upon receiving an interrupt signal from the OS, it prints the required message and then exits.
1 2 3 4
Doing Work Doing Work Doing Work Thanks for using Golang!
Conclusion
This simple example can be extrapolated to handle many real-life scenarios, such as gracefully shutting down servers and receiving commands in command-line applications.
Coming from a PHP background, I instantly fell in love with Go after checking out the syntax and building small projects with it. What stood out most to me was the simplistic approach to lower level operations in Go, ranging from references and pointers to concurrency.
In this article, I will share my experience with concurrency with the aid of a small tool. The program fetches issues from the xkcd comics website and downloads each URL to build an offline JSON index. At the time of writing, there are over 2500 comics (URLs) to download.
Why concurrency?
Much has been written on the concurrency feature of Go so I’ll just share my experience on what I know it does for this project. As stated earlier, the xkcd website has over 2500 comics to download. To do this sequentially (that is, one at a time), it would take a long time (probably hours). If you happen to be very patient, there is still a very high chance the operation would fail due to factors such as the rate limiting feature on the website. It would not make any sense to download this resource sequentially (trust me, I tried).
By using a concurrent model, I was able to implement a Worker pool (to be explained later) to handle multiple HTTP requests at a time, keeping the connection alive and getting multiple results in a very short time.
What is this concurrent model? In Go, it is simply creating multiple goroutines to handle parts of the processes. A goroutine is Go’s way of achieving concurrency. They are functions that run concurrently with other functions. A goroutine can be compared to a lightweight thread (although it’s not a thread, as many goroutines can work on a single thread) which makes it lighter, faster and reliable. You can create as many as one million goroutines in one program. When two or more goroutines are running, they need a way to communicate with each other. That’s where channels come in.
To build this program, we will depend heavily on goroutines and channels, and to maintain the focus of this article, I will leave links below to explain these fundamental concepts better.
Planning and Design
The xkcd website features a JSON interface to allow external services use their API. We will be downloading the data from this interface to build our offline index.
Based on the above output, we can design our struct. This struct will be used as a model for what data we want to extract for JSON handling:
1 2 3 4 5 6 7 8 9 10 11 12 13 14 15
package main
type Result struct { Month string`json:"month"` Num int`json:"num"` Link string`json:"link"` Year string`json:"year"` News string`json:"news"` SafeTitle string`json:"safe_title"` Transcript string`json:"transcript"` Alt string`json:"alt"` Img string`json:"img"` Title string`json:"title"` Day string`json:"day"` }
Fetching the comic
Now, before we jump into concurrency, we want to establish a function that serves the core purpose of the application — fetching the comic. The function has to be independent of our architecture and give room for re-usability across the program. I’ll explain each step below:
resp, err := client.Do(req) if err != nil { returnnil, fmt.Errorf("http err: %v", err) } var data Result // error from web service, empty struct to avoid disruption of process if resp.StatusCode != http.StatusOK { data = Result{ } } else { if err := json.NewDecoder(resp.Body).Decode(&data); err != nil { returnnil, fmt.Errorf("json err: %v", err) } } resp.Body.Close()
return &data, nil }
First we create a custom HTTP client and set timeout to 5 seconds. After joining the strings using the strings package, we create a new request and send it using the previously created client. If the request is successful, we decode the data from JSON into our local struct. Then we close the response body and return a pointer to the struct.
Confirm it works
So far we have implemented the core structure of the application. Let’s run this part to ensure our code works as expected. Here’s the complete code so far:
type Result struct { Month string`json:"month"` Num int`json:"num"` Link string`json:"link"` Year string`json:"year"` News string`json:"news"` SafeTitle string`json:"safe_title"` Transcript string`json:"transcript"` Alt string`json:"alt"` Img string`json:"img"` Title string`json:"title"` Day string`json:"day"` }
resp, err := client.Do(req) if err != nil { returnnil, fmt.Errorf("http err: %v", err) } var data Result // error from web service, empty struct to avoid disruption of process if resp.StatusCode != http.StatusOK { data = Result{ } } else { if err := json.NewDecoder(resp.Body).Decode(&data); err != nil { returnnil, fmt.Errorf("json err: %v", err) } } resp.Body.Close()
return &data, nil }
funcmain() { n := 200 result, err := fetch(n) if err != nil { log.Fatal(err) } fmt.Printf("%v\n", result.Title) }
Expected output for the title is “Bill Nye”, which is the title for issue #200. You can change the issue number to verify further.
Channels Setup
As stated earlier, we will be creating a Worker pool to concurrently handle the operations. To do that, we have to set up buffered channels. A buffered channel is simply a channel with a specified capacity. With a buffered channel, send operations are blocked when the buffer is full and receive operations are blocked when the buffer is empty. We need this feature because in a Worker Pool, we assign multiple jobs to a number of workers and we want to ensure they are handled in an organized way. An example:
1
ch := make(chanint, 6)
If we have 6 workers in our worker pool, this buffered channel will ensure at every point in time, at most 6 jobs are given to the 6 workers.
1
2
3
4
5
6
7
8
9
10
var jobs = make(chan Job, 100) var results = make(chan Result, 100) var resultCollection []Result
funcallocateJobs(noOfJobs int) { for i := 0; i <= noOfJobs; i++ { jobs <- Job{i+1} } close(jobs) }
After creating the buffered channels and setting up the final results variable, we created a function to allocate jobs to the jobs channel. As expected, this function will block when i = 100, which means no new job will be added until a job has been received by the worker. After all available jobs have been allocated, the jobs channel will be closed to avoid further writes.
Create the Worker pool
A worker pool maintains multiple threads (or in our case, goroutines) and waits for tasks (jobs) to be assigned to them. For example, let’s say we have 1000 jobs. We create a worker pool which spawns 100 workers. If the jobs channel is buffered at 100-capacity, the workers takes in the 100 jobs, and as some jobs are done processing, new jobs are being allocated, which goes to the workers, and so on.
Our worker pool will make use of Go’s WaitGroup, a synchronization primitive (type) that tells the main goroutine to wait for a collection of goroutines to finish.
funcworker(wg *sync.WaitGroup) { for job := range jobs { result, err := fetch(job.number) if err != nil { log.Printf("error in fetching: %v\n", err) } results <- *result } wg.Done() }
funccreateWorkerPool(noOfWorkers int) { var wg sync.WaitGroup for i := 0; i <= noOfWorkers; i++ { wg.Add(1) go worker(&wg) } wg.Wait() close(results) }
In the code, we first define a worker function. The worker gets a job from the allocated jobs channel, processes the result, and passes the value to the results channel. In the createWorkerPool function, we use the WaitGroup primitive to set up a Worker pool. The wg.Add(1) call increments the WaitGroup counter. The counter must be zero if the program is to stop running (which is why we have the wg.Wait() call). The wg.Done() call in the worker function decrements the counter and if all is done, the control is returned to the main goroutine and the results channel is closed to prevent further writes.
Get the results
The results are being added to the results channel we created. However, it is buffered and can only accept 100 at a time. We need a seperate goroutine to retrieve the results and give room for other results. Here’s how we do that:
1 2 3 4 5 6 7 8 9
funcgetResults(done chanbool) { for result := range results { if result.Num != 0 { fmt.Printf("Retrieving issue #%d\n", result.Num) resultCollection = append(resultCollection, result) } } done <- true }
If the result from the results channel is valid, we append it to the results collection. We have a boolean channel named “done”; we will use it to check if all the results have been collated.
Putting it all together
We have a bunch of functions, variables and types declarations, but how do we put them together? Which function is executed first and why? In this last section, we will see how it all comes together.
First, we allocate jobs. We use 3000 because at the time of writing, xkcd has over 2500 comic issues, and we want to make sure we get all of them.
Exercise: Create a small program that tells you exactly how many issues are on the xkcd website, to remove the need for an estimate.
To allocate, we start a goroutine. Note that this goroutine will block once 100 jobs have been added to the channel. It will wait for another goroutine to read the jobs channel.
We start a goroutine to collect the results. Why do this now? Well, the results channel is currently empty. Trying to read data from it will block the routine, until data has been written to the channel.
That makes it 2 goroutines blocked and waiting for read and write operations.
We create the Worker pool. This spawns many workers (100 in our example) and they read from the jobs channel, and write to the results channel.
That begins to satisfy the 2 blocked goroutines we had earlier.
We get the value of the “done” boolean channel to ensure all results have been collected.
Then we convert to JSON and write the data to file.
type Result struct { Month string`json:"month"` Num int`json:"num"` Link string`json:"link"` Year string`json:"year"` News string`json:"news"` SafeTitle string`json:"safe_title"` Transcript string`json:"transcript"` Alt string`json:"alt"` Img string`json:"img"` Title string`json:"title"` Day string`json:"day"` } const Url = "https://xkcd.com"
resp, err := client.Do(req) if err != nil { returnnil, fmt.Errorf("http err: %v", err) } var data Result // error from web service, empty struct to avoid disruption of process if resp.StatusCode != http.StatusOK { data = Result{ } } else { if err := json.NewDecoder(resp.Body).Decode(&data); err != nil { returnnil, fmt.Errorf("json err: %v", err) } } resp.Body.Close()
return &data, nil }
type Job struct { number int }
var jobs = make(chan Job, 100) var results = make(chan Result, 100) var resultCollection []Result
funcallocateJobs(noOfJobs int) { for i := 0; i <= noOfJobs; i++ { jobs <- Job{i+1} } close(jobs) }
funcworker(wg *sync.WaitGroup) { for job := range jobs { result, err := fetch(job.number) if err != nil { log.Printf("error in fetching: %v\n", err) } results <- *result } wg.Done() }
funccreateWorkerPool(noOfWorkers int) { var wg sync.WaitGroup for i := 0; i <= noOfWorkers; i++ { wg.Add(1) go worker(&wg) } wg.Wait() close(results) }
funcgetResults(done chanbool) { for result := range results { if result.Num != 0 { fmt.Printf("Retrieving issue #%d\n", result.Num) resultCollection = append(resultCollection, result) } } done <- true }
funcmain() { // allocate jobs noOfJobs := 3000 go allocateJobs(noOfJobs)
// get results done := make(chanbool) go getResults(done)
// create worker pool noOfWorkers := 100 createWorkerPool(noOfWorkers)
// wait for all results to be collected <-done
// convert result collection to JSON data, err := json.MarshalIndent(resultCollection, "", " ") if err != nil { log.Fatal("json err: ", err) }
// write json data to file err = writeToFile(data) if err != nil { log.Fatal(err) } }