0%

我什么也没忘,但是有些事只适合收藏。不能说,也不能想,却又不能忘

问题出现

当Elasticsearch所在磁盘占用大于等于95%时,Elasticsearch会把所有相关索引自动置为只读。无法插入新的数据,错误信息如下:

1
2
3
4
5
6
7
8
9
10
11
12
13
{
"error": {
"root_cause": [
{
"type": "cluster_block_exception",
"reason": "blocked by: [FORBIDDEN/12/index read-only / allow delete (api)];"
}
],
"type": "cluster_block_exception",
"reason": "blocked by: [FORBIDDEN/12/index read-only / allow delete (api)];"
},
"status": 403
}

解决方案

查看index信息

1
curl -GET 'localhost:9200/index_name/_settings?pretty'

返回信息

1
2
3
4
5
6
7
8
9
10
11
12
13
14
15
16
17
18
19
20
{
"index_name" : {
"settings" : {
"index" : {
"number_of_shards" : "5",
"blocks" : {
"read_only_allow_delete" : "true"
},
"provided_name" : "index_name",
"creation_date" : "1516454800021",
"number_of_replicas" : "1",
"uuid" : "6WjhtrARTOOjsEUaOqNzlw",
"version" : {
"created" : "6010199"
}
}
}
}
}

发现确实这个索引的 read_only_allow_delete 属性是 true,由此导致了无法再向其中插入文档。

解决方案有两种:

  • 1.清理磁盘,使占用低于95%。
  • 2.调整自动锁阀值,官方文档中有详尽方法。

建议采用第一种,注意解决之后,需要手动把被锁的索引的只读模式关闭。

1
curl -XPUT -H "Content-Type: application/json" http://127.0.0.1:9200/_all/_settings -d '{"index.blocks.read_only_allow_delete": null}'

返回成功

1
{"acknowledged":true}

清理磁盘占用

删除文档并没有真正删除,仅作了删除标记,从而不能再被搜索到

查看磁盘占用

1
curl -XGET 127.0.0.1:9200/_cat/allocation?v

结果

1
2
3
shards disk.indices disk.used disk.avail disk.total disk.percent host       ip         node
12 72.9kb 56.6gb 2.3gb 58.9gb 96 172.18.0.2 172.18.0.2 elasticsearch
12 UNASSIGNED

使用df -h命令,发现docker下的overlay磁盘占用很大

1
2
3
4
5
6
7
8
9
10
11
12
文件系统        容量  已用  可用 已用% 挂载点
/dev/vda1 40G 35G 3.2G 92% /
devtmpfs 3.9G 0 3.9G 0% /dev
tmpfs 3.9G 0 3.9G 0% /dev/shm
tmpfs 3.9G 137M 3.7G 4% /run
tmpfs 3.9G 0 3.9G 0% /sys/fs/cgroup
tmpfs 783M 0 783M 0% /run/user/1000
overlay 40G 35G 3.2G 92% /var/lib/docker/overlay/110e4d61d36d50cee7c5990fb42a84f4c7ae6003ea30032e10f497f4bf535bbb/merged
shm 64M 0 64M 0% /var/lib/docker/containers/2f532a830e88ca7d8483e34e3d940e25b371f09560dca4106900323da6943433/shm
tmpfs 783M 0 783M 0% /run/user/0
overlay 40G 35G 3.2G 92% /var/lib/docker/overlay/f17d62b3550c9ec4138aab76bb1e2da0abf289bb378ef78e5a843dd8b3924902/merged
shm 64M 0 64M 0% /var/lib/docker/containers/6d3e12fbf3137c6c11797957c2ee593ee068c3486397672965f6e8c5af31390f/shm

使用docker ps -a查看是否存在已经死掉的容器没有被删除,发现果然存在

1
2
3
4
5
CONTAINER ID        IMAGE                 COMMAND                  CREATED             STATUS                     PORTS                                            NAMES
6d3e12fbf313 halcms "/bin/sh -c 'echo ..." 24 hours ago Up 24 hours 0.0.0.0:8083->8080/tcp docker_halcms-app_1
2f532a830e88 elasticsearch:2.3.5 "/docker-entrypoin..." 2 years ago Up 4 weeks 0.0.0.0:9200->9200/tcp, 0.0.0.0:9300->9300/tcp halcms-elasticsearch
8e73d3c2b62d 6fd9e186667b "/bin/sh -c 'sh -c..." 2 years ago Exited (127) 2 years ago adoring_curran
cfc19946e8b6 817e3ed9255c "/bin/sh -c 'sh -c..." 2 years ago Exited (127) 2 years ago elated_banach

使用docker system df命令查看Docker的磁盘使用情况

1
2
3
4
TYPE                TOTAL               ACTIVE              SIZE                RECLAIMABLE
Images 94 2 18.77GB 18.22GB (97%)
Containers 4 2 60.17kB 0B (0%)
Local Volumes 2 2 6.92MB 0B (0%)

使用docker system prune自动清理空间

1
2
3
docker system prune命令只能清除悬空镜像,未被使用的镜像不会被删除。

docker system prune -a命令可以清理

拓展API

查看所有index

1
curl '127.0.0.1:9200/_cat/indices?v'

删除index

1
curl -XDELETE http://127.0.0.1:9200/indexname1,indexname2

https://www.villagehead.cn/2019/11/19/docker%E4%B8%8B%E7%9A%84-var-lib-docker-overlay%E6%96%87%E4%BB%B6%E5%BE%88%E5%A4%A7%EF%BC%8C%E9%80%A0%E6%88%90%E6%9C%8D%E5%8A%A1%E5%99%A8%E7%A3%81%E7%9B%98%E6%8A%A5%E8%AD%A6/

早知如此绊人心,何如当初莫相识

面向对象

1
2
3
4
5
6
7
8
9
10
11
12
13
14
15
16
17
18
19
20
21
22
23
24
25
26
27
28
29
30
31
32
33
34
35
36
37
38
39
40
41
42
43
44
45
46
47
package main

import (
"fmt"
"strings"
"time"
)

type LogProccess struct {
rc chan string
wc chan string
path string
influxDBDsn string
}

func (l * LogProccess) ReadFromFile() {

line := "message"
l.rc <-line
}

func (l *LogProccess) Proccess() {
data := <-l.rc
l.wc <- strings.ToUpper(data)
}

func (l *LogProccess) WriteToImfluxDB() {
fmt.Println(<-l.wc)
}

func main() {

lp := &LogProccess{
rc: make(chan string),
wc: make(chan string),
path: "/tmp/access.log",
influxDBDsn: "",
}

go lp.ReadFromFile()

go lp.Proccess()

go lp.WriteToImfluxDB()

time.Sleep(time.Second * 1)
}

接口实现

1
2
3
4
5
6
7
8
9
10
11
12
13
14
15
16
17
18
19
20
21
22
23
24
25
26
27
28
29
30
31
32
33
34
35
36
37
38
39
40
41
42
43
44
45
46
47
48
49
50
51
52
53
54
55
56
57
58
59
60
61
62
63
64
65
66
67
68
69
70
71
72
73
74
75
76
77
78
package main

import (
"fmt"
"strings"
"time"
)

// 接口
type Reader interface {
Read(rc chan string)
}

type Writer interface {
Write(wc chan string)
}

// 类
type ReadFromFile struct {
path string
}

type WriteToInfluxDB struct {
influxDBDsn string
}

// 类里面的方法
func (r *ReadFromFile) Read (rc chan string) {
line := "message"
rc <- line
}

func (w *WriteToInfluxDB) Write(wc chan string) {
fmt.Println(<-wc)
}

type LogProccess struct {
rc chan string
wc chan string
read Reader // 接口
write Writer // 接口
}


func (l *LogProccess) Proccess() {
data := <-l.rc
l.wc <- strings.ToUpper(data)
}


func main() {


r := &ReadFromFile{
path: "gggg",
}

w := &WriteToInfluxDB{
influxDBDsn: "hh",
}


lp := &LogProccess{
rc: make(chan string),
wc: make(chan string),
read: r,
write: w,
}

go lp.read.Read(lp.rc)

go lp.Proccess()

go lp.write.Write(lp.wc)

time.Sleep(time.Second * 1)
}

写文件

1
2
3
4
5
6
7
8
9
10
11
12
13
14
15
16
17
18
19
20
21
22
23
24
25
26
27
28
29
30
31
32
33
34
35
36
37
38
39
40
41
42
43
44
45
46
47
48
49
50
51
52
53
54
55
56
57
58
59
60
61
62
63
64
65
66
67
68
69
70
71
72
73
74
75
76
77
78
79
80
81
82
83
84
85
86
87
88
89
90
91
92
93
94
95
96
97
98
99
100
101
102
103
104
105
106
package main

import (
"bufio"
"fmt"
"io"
"os"
"strings"
"time"
)

// 接口
type Reader interface {
Read(rc chan []byte)
}

type Writer interface {
Write(wc chan string)
}

// 类
type ReadFromFile struct {
path string
}

type WriteToInfluxDB struct {
influxDBDsn string
}

// 类里面的方法
func (r *ReadFromFile) Read (rc chan []byte) {

f, err := os.Open(r.path)
if err != nil {
panic(err)
}

_, _ = f.Seek(0, 2) // 从文件末尾逐行读取文件内容
rd := bufio.NewReader(f)

for {
line, err := rd.ReadBytes('\n')
if err == io.EOF {
time.Sleep(500 * time.Millisecond)
fmt.Println("=============")
continue
} else if err != nil {
panic(err)
}

rc <-line[:len(line)-1]
}

}

func (w *WriteToInfluxDB) Write(wc chan string) {
//fmt.Println(<-wc)

for v := range wc {
fmt.Println(v)
}
}

type LogProccess struct {
rc chan []byte
wc chan string
read Reader // 接口
write Writer // 接口
}


func (l *LogProccess) Proccess() {

for v:= range l.rc {
l.wc <- strings.ToUpper(string(v))
}
}


func main() {

r := &ReadFromFile{
path: "./access.log",
}

w := &WriteToInfluxDB{
influxDBDsn: "hh",
}


lp := &LogProccess{
rc: make(chan []byte),
wc: make(chan string),
read: r,
write: w,
}

go lp.read.Read(lp.rc)

go lp.Proccess()

go lp.write.Write(lp.wc)

time.Sleep(time.Second * 100)
}

你知道好坏,让自己朝着正确的方向转变…

区别

len()可以用来查看数组或slice的长度

cap()可以用来查看数组或slice的容量

在数组中由于长度固定不可变,因此len(arr)和cap(arr)的输出永远相同

在slice中,len(sli)表示可见元素有几个(也即直接打印元素看到的元素个数),而cap(sli)表示所有元素有几个,比如:

1
2
3
4
5
arr := []int{2, 3, 5, 7, 11, 13}
sli := arr[1:4]
fmt.Println(sli)
fmt.Println(len(sli))
fmt.Println(cap(sli))

输出

1
2
3
[3 5 7]
3
5

查看一共有几个元素的方法:

1
fmt.Println(sli[:cap(sli)])

输出

1
[3 5 7 11 13]

拓展

切片拥有 长度 和 容量。

切片的长度就是它所包含的元素个数。

切片的容量是从它的第一个元素开始数,到其底层数组元素末尾的个数。

切片概念是只包含左边元素不包含右边元素

最难理解的是切片的容量,我们可以把容量当做成总长度减去左指针走过的元素值,比如:

1
2
3
s[:0] ——> cap = 6 - 0 =6

s[2:] ——> cap = 6 - 2 = 4

我们终此一生,就是要摆脱他人的期待,找到真正的的自己

简单版

1
2
3
4
5
6
7
8
9
10
11
12
13
14
15
16
17
18
19
20
21
22
23
24
25
26
27
28
29
30
package main

import (
"fmt"
"time"
)

func main() {

go loading(time.Millisecond * 100)
fmt.Println("\n", fib(45))

}

func fib(x int) int {
if x < 2 {
return x
}

return fib(x-2) + fib(x-1)
}

func loading(delay time.Duration) {
for {
for _,r := range `-\|/` {
fmt.Printf("\r%c", r)
time.Sleep(delay)
}
}
}

并发版

使用无缓冲通道实现

1
2
3
4
5
6
7
8
9
10
11
12
13
14
15
16
17
18
19
20
21
22
23
24
25
26
package main

import (
"fmt"
)

func fibonacci(n int, c chan int) {

x, y := 0, 1
for i := 0; i < n; i++ {
c <- x
x, y = y, x+y
}

close(c)
}

func main() {
c := make(chan int, 60)

go fibonacci(cap(c), c)

for i := range c {
fmt.Println(i)
}
}

你的善良,必须带点锋芒,否则等于零。

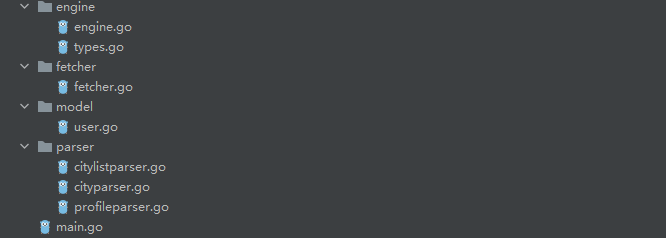
项目结构

源码分析

main.go

1
2
3
4
5
6
7
8
9
10
11
12
13
14
15
16
package main

import (
"test/engine"
"test/parser"
)

func main() {

url := "http://www.zhenai.com/zhenghun"

engine.Run(engine.Request{
Url:url,
ParserFunc:parser.ParseCityList,
})
}

types.go

1
2
3
4
5
6
7
8
9
10
11
12
13
14
15
16
17
18
package engine

//解析后返回的结果
type ParseResult struct {
Requests []Request
Items []interface{}
}


type Request struct {
Url string //解析出来的URL
ParserFunc func([]byte) ParseResult //处理这个URL所需要的函数
}


func NilParser([] byte) ParseResult {
return ParseResult{}
}

engine.go

1
2
3
4
5
6
7
8
9
10
11
12
13
14
15
16
17
18
19
20
21
22
23
24
25
26
27
28
29
30
package engine

import (
"log"
"test/fetcher"
)


func Run(seeds ...Request) {

var requests []Request
for _, r := range seeds {
requests = append(requests, r)
}
for len(requests) > 0 {
r := requests[0]
requests = requests[1:]
log.Printf("Fetching %s",r.Url)
body, err := fetcher.Fetch(r.Url)
if err != nil {
log.Printf("Fetcher: error fetching url %s %v", r.Url, err)
continue
}
parseResult := r.ParserFunc(body)
requests = append(requests, parseResult.Requests...)
for _,item:=range parseResult.Items{
log.Printf("Got item %v",item)
}
}
}

fetcher.go

1
2
3
4
5
6
7
8
9
10
11
12
13
14
15
16
17
18
19
20
21
22
23
24
25
26
27
28
29
30
31
32
33
34
35
36
37
38
39
40
41
42
43
44
45
46
47
48
49
50
51
52
53
54
55
56
57
58
59
60
61
62
63
package fetcher

import (
"bufio"
"fmt"
"golang.org/x/net/html/charset"
"golang.org/x/text/encoding"
"golang.org/x/text/encoding/unicode"
"golang.org/x/text/transform"
"io/ioutil"
"log"
"net/http"
"strings"
)


/**
fetcher:根据url获取对应的数据
*/
func Fetch(url string) ([] byte, error) {
/*
resp, err := http.Get(url)
if err != nil {
return nil, err
}
*/

newUrl := strings.Replace(url, "http://", "https://", 1)

request, _:=http.NewRequest(http.MethodGet,newUrl,nil)
request.Header.Add("User-Agent","Mozilla/5.0 (iPhone; CPU iPhone OS 11_0 like Mac OS X) AppleWebKit/604.1.38 (KHTML, like Gecko) Version/11.0 Mobile/15A372 Safari/604.1")


// 1 分钟有效cookie


cookie := "ec=efexs2yx-1635059763651-4354f6812c7ee-1160473905; FSSBBIl1UgzbN7NO=50VBKV5hc0utxjqurAbThL2oOHItIEhFghdO1gdWyFhazAg7AKjmWBYnVMsPSVDRiSAKC1Xi7Q2JXDaDrAzn2ZA; sid=WoTVURTyXnfFuyrLjyvP; _exid=SOFFj%2B9FuKQsSSQgAHQq1wFmbHHxiumUgMg4agh6CvCmn1kBX5i%2FP3FzOUtJH99IXis2NS1cc7PdW1UAoVTmSA%3D%3D; _efmdata=7d%2FA9aWpDcKzs29MsTO%2BMHTqjG75uCjz%2BbNOD2sXTBvXMYfHCfSN3NSqzEYUGO5tguKli8YS2L9O%2BK0VpRv%2BFuWqAGZg0j5PpOcDcQTauuM%3D; FSSBBIl1UgzbN7NP=53UVQdDmToH3qqqmZ7Uve0qwxpoCJMOOrBMPxhuW8HW8qPf4rKCR6C4GFdQb8y3yKH_bypWGA3JltlGZ0vedtR6ADPk5sn5aPIY7hB6efB0Wb097cXT1oSxo9LEwwzKsCBODguMmpY6uu3ArHiNpf9jssSGUNPokhuA9tR2Yz7SzJj4GdbBbGGjXP0Ud_TqzsxWtedn9P7LbXq_bZhEMMoR3i74qQ8_iTxWxJ0mTxcp1b3_0PrIoM1wqhWiwJ9256Nlqw4AU5x7UvW4f_TW0cBtBBCkP9L3ud_3O1cKMFZEOaAJ0_a2UKSM70P0s87RA8G"
request.Header.Add("cookie", cookie)

resp,_:=http.DefaultClient.Do(request)
defer resp.Body.Close()
if resp.StatusCode != http.StatusOK {
fmt.Println("resp:",resp)
return nil, fmt.Errorf("error:status code:%d", resp.StatusCode)
}
//如果页面传来的不是utf8,我们需要转为utf8格式
bodyReader := bufio.NewReader(resp.Body)
e := determineEncoding(bodyReader)
utf8Reader := transform.NewReader(bodyReader, e.NewDecoder())
return ioutil.ReadAll(utf8Reader)
}


func determineEncoding(r *bufio.Reader) encoding.Encoding {
bytes, err := r.Peek(1024)
if err != nil {
log.Printf("Ftcher error:%v", err)
return unicode.UTF8
}
e, _, _ := charset.DetermineEncoding(bytes, "")
return e
}

citylistparser.go

1
2
3
4
5
6
7
8
9
10
11
12
13
14
15
16
17
18
19
20
21
22
23
24
25
26
27
28
29
30
31
package parser
import (
"regexp"
"test/engine"
)
const cityListRe = `<a href="(http://www.zhenai.com/zhenghun/[0-9a-z]+)" [^>]*>([^<]+)</a>`


//解析城市信息
func ParseCityList(contents []byte) engine.ParseResult {
re := regexp.MustCompile(cityListRe)
all := re.FindAllSubmatch(contents, -1)
result := engine.ParseResult{}

i := 0

for _, c := range all {
result.Items = append(result.Items, string(c[2])) //城市名字
result.Requests = append(result.Requests, engine.Request{
Url: string(c[1]),
ParserFunc: ParseCity,
})

i++
if i == 2 {
break
}
}

return result
}

cityparser.go

1
2
3
4
5
6
7
8
9
10
11
12
13
14
15
16
17
18
19
20
21
22
23
24
25
26
27
28
29
package parser

import (
"fmt"
"regexp"
"test/engine"
)

const cityRe = `<a href="(http://album.zhenai.com/u/[0-9]+)"[^>]*>([^<]+)</a>`


//解析信息
func ParseCity(contents []byte) engine.ParseResult {
re := regexp.MustCompile(cityRe)
all := re.FindAllSubmatch(contents, -1)
result := engine.ParseResult{}
for _, c := range all {
fmt.Println("用户url:", string(c[1]))
result.Items = append(result.Items, "User:"+string(c[2])) //用户名字
name := string(c[2])
result.Requests = append(result.Requests, engine.Request{
Url: string(c[1]),
ParserFunc: func(c []byte) engine.ParseResult {
return ParseProfile(c, name)
},
})
}
return result
}

profileparser.go

1
2
3
4
5
6
7
8
9
10
11
12
13
14
15
16
17
18
19
20
21
22
23
24
25
26
27
28
29
30
31
32
33
34
35
36
37
38
39
40
41
42
43
44
45
46
47
48
49
50
51
52
53
54
55
56
57
58
59
60
61
62
63
64
65
66
67
68
69
70
71
72
73
74
75
76
77
78
79
80
81
82
83
84
85
86
package parser

import (
"fmt"
"github.com/bitly/go-simplejson"
"log"
"regexp"
"test/engine"
"test/model"
)

var re = regexp.MustCompile(`<script>window.__INITIAL_STATE__=(.+);\(function`)


func ParseProfile(contents []byte, name string) engine.ParseResult {
fmt.Println("-------------------")
match := re.FindSubmatch(contents)
result := engine.ParseResult{}
if len(match) >= 2 {
json := match[1]
//fmt.Printf("json : %s\n",json)
profile := parseJson(json)
profile.Name = name
//fmt.Println(profile)
result.Items = append(result.Items, profile)
fmt.Println(result)
}
return result
}


//解析json数据
func parseJson(json []byte) model.Profile {

res, err := simplejson.NewJson(json)
if err != nil {
log.Println("解析json失败。。")
}

infos, err := res.Get("objectInfo").Get("basicInfo").Array()
//infos是一个切片,里面的类型是interface{}
//fmt.Printf("infos:%v, %T\n", infos, infos) //infos:[离异 47岁 射手座(11.22-12.21) 157cm 55kg 工作地:阿坝汶川 月收入:3-5千 教育/科研 大学本科], []interface {}
var profile model.Profile
//所以我们遍历这个切片,里面使用断言来判断类型
for k, v := range infos {
//fmt.Printf("k:%v,%T\n", k, k)
//fmt.Printf("v:%v,%T\n", v, v)
/*
"basicInfo":[
"未婚",
"25岁",
"魔羯座(12.22-01.19)",
"152cm",
"42kg",
"工作地:阿坝茂县",
"月收入:3-5千",
"医生",
"大专"
],
*/
if e, ok := v.(string); ok {
switch k {
case 0:
profile.Marriage = e
case 1:
//年龄:47岁,我们可以设置int类型,所以可以通过另一个json字段来获取
profile.Age = e
case 2:
profile.Xingzuo = e
case 3:
profile.Height = e
case 4:
profile.Weight = e
case 6:
profile.Income = e
case 7:
profile.Occupation = e
case 8:
profile.Education = e
}
}
}
return profile
}

user.go

1
2
3
4
5
6
7
8
9
10
11
12
13
14
15
16
17
18
package model

//珍爱网用户对象模型
type Profile struct {
Name string //姓名
Marriage string //婚况
Age string //年龄
Gender string //性别
Height string //身高
Weight string //体重
Income string //收入
Education string //教育
Occupation string //职业
Hukou string //籍贯户口
Xingzuo string //星座
House string //房子
Car string //车
}

有些鸟儿是注定不会被关在牢笼里的,它们的每一片羽毛都闪耀着自由的光辉

Go语言中有两种可以储存一串字符的类型,分别是字符串stringbyte类型数组[]byte,但是他们直接并不能直接使用等于号赋值,也不能单纯的转换,而是要通过切片来进行转换。

string转换成[]byte

可以直接使用[]byte(str)强制转换。

1
2
3
4
5
6
7
8
9
10
11
12
package main

import "fmt"

func main() {
var str string = "test"
var data []byte = []byte(str)

fmt.Println("string: ", str) // string: test
fmt.Println("[]byte: ", data) // []byte: [116 101 115 116]
}

可以看到[]byte输出的结果正是string的各个字符对应的ASCII码。
或者

1
2
3
4
5
6
7
8
9
func String2Bytes(s string) []byte {
sh := (*reflect.StringHeader)(unsafe.Pointer(&s))
bh := reflect.SliceHeader{
Data: sh.Data,
Len: sh.Len,
Cap: sh.Len,
}
return *(*[]byte)(unsafe.Pointer(&bh))
}

[]byte转换成string

要将byte数组转换成string不能直接转换,而需要将[]byte的切片转换。即使用string(数组名[:])进行转换。

1
2
3
4
5
6
7
8
9
10
11
12
13
14
15
package main

import "fmt"

func main() {
var data [5]byte
data[0] = 'T'
data[1] = 'E'
data[2] = 'S'
data[3] = 'T'
var str string = string(data[:])
fmt.Println("[]byte: ", data) // []byte: [84 69 83 84 0]
fmt.Println("string: ", str) // string: TEST
}

或者

1
2
// []byte to string
s2 := string(b)

再或者

1
2
3
func Bytes2String(b []byte) string {
return *(*string)(unsafe.Pointer(&b))
}

二者区别

对于[]byte与string而言,两者之间最大的区别就是string的值不能改变。这该如何理解呢?下面通过两个例子来说明。

对于[]byte来说,以下操作是可行的:

1
2
b := []byte("Hello Gopher!")
b [1] = 'T'

string,修改操作是被禁止的:

1
2
s := "Hello Gopher!"
s[1] = 'T'

而string能支持这样的操作:

1
2
s := "Hello Gopher!"
s = "Tello Gopher!"

字符串的值不能被更改,但可以被替换。

我喜欢之前的生活,没有钱也很好

CentOS 7的服务器上只有Python2,先安装一下Python3的环境

安装Python3环境

1.首先安装编译环境(后续需要从python官网获取Python3的源码自己编译python)

1
yum install zlib-devel bzip2-devel openssl-devel ncurses-devel sqlite-devel readline-devel tk-devel gcc make

2.从官网下载python3的源码

1
wget https://www.python.org/ftp/python/3.6.2/Python-3.6.2.tar.xz

3.依次执行 解压>进入解压后的目录>编译安装

1
2
3
4
tar -xvJf  Python-3.6.2.tar.xz
cd Python-3.6.2
./configure prefix=/usr/local/python3
make && make install

4.安装完毕,创建软连接

1
2
3
4
5
ln -s /usr/local/python3/bin/python3 /usr/bin/python
# 执行命令
python -V #将会看到python3的版本
# 执行命令
python2 -V #将会看到python2的版本

5.后续工作,由于执行CentOS的yum命令需要使用自带的python2的版本,所以需要做两处修改

1
2
3
4
vim /usr/bin/yum
vim /usr/libexec/urlgrabber-ext-down
#将 这两个文件的 #! /usr/bin/python修改为 #! /usr/bin/python2

将本地开发环境的依赖项目生成清单文件

1.在本地的开发环境中,env下执行:

1
pip3 freeze >requirements.txt

清单文件将会生成在当前项目目录下,内容如下所示

1
2
3
4
5
certifi==2018.4.16
chardet==3.0.4
idna==2.7
requests==2.19.1
urllib3==1.23

将生成后的文件上传到linux服务器

2.将Python项目上传到服务器

在linux服务器上为项目创建虚拟环境,并安装项目所需的依赖

1.切换到pip3所在的目录 /usr/local/python/bin,执行以下命令

1
2
3
4
5
6
7
8
9
10
11
12
13
14
15
16
17
# 安装虚拟环境
pip3 install virtualenv

# 创建虚拟环境 ENV
virtualenv ENV

# 切换到虚拟环境所在的目录
cd ENV

# 启用虚拟环境
source ./bin/activate

# 安装依赖清单里的库
pip3 install -r requirements.txt

# 列出当前虚拟环境所安装的依赖库
pip3 list

添加自定义系统服务

1
2
# 这样的命令在ssh终端退出后,python进程也会被杀掉
python xxx.py &

需要创建一个自定义的系统服务,来保证python程序能够在后台运行。
1.创建系统服务

1
vim /usr/lib/systemd/system/robot.service

内容如下:

1
2
3
4
5
6
7
8
9
10
11
[Unit]
Description=robot
After=network.target

[Service]
Type=forking
ExecStart=/usr/local/python3/bin/ENV/bin/python /usr/local/python3/bin/ENV/p3.py &
PrivateTmp=true

[Install]
WantedBy=multi-user.target

ExecStart为服务启动时执行的命令,不能用相对路径, 一定要全路径。
这里也可以将命令写到任意的.sh文件中,这里写.sh文件的全路径也是可以的。
2.启用自定义系统服务

1
systemctl enable robot

3.启动服务

1
systemctl start robot

可以查看进程,确认一下服务是否启动

1
ps aux|grep robot

https://lanshiqin.com/d8d0505b/

长亭外,古道边,芳草碧连天。 晚风扶柳笛声残,夕阳山外山。

在 homestead 的 homestead.yml 配置文件中添加

1
2
3
4
5
6
7
8
9
10
11
12
13
features:
- mariadb: false
- ohmyzsh: false
- webdriver: false
- elasticsearch:
version: 7.6

ports:
- send: 63790
to: 6379
- send: 9100
to: 9200

开启 homestead 中的 elasticsearch

因为需要安装软件镜像在国外,所以需要设置国内的镜像

打开 homestead/scripts/features/elasticssearch.sh 文件

将 apt-get 安装的内容替换为

1
2
3
4
5
6
7
8
9
10
11
12
13
14

sed -i "s@http://.*archive.ubuntu.com@http://mirrors.huaweicloud.com@g" /etc/apt/sources.list
sed -i "s@http://.*security.ubuntu.com@http://mirrors.huaweicloud.com@g" /etc/apt/sources.list

sudo apt-get update

wget https://mirrors.huaweicloud.com/elasticsearch/7.6.1/elasticsearch-7.6.1-amd64.deb
sudo apt-get -y install openjdk-11-jre
# sudo apt-get -y install elasticsearch"$installVersion"

sudo dpkg -i elasticsearch-7.6.1-amd64.deb
# Start Elasticsearch on boot

sudo update-rc.d elasticsearch defaults 95 10

设置外网访问

在 /etc/elasticsearch/elasticsearch.yml 中添加

1
2
network.host: 0.0.0.0
discovery.seed_hosts: ["127.0.0.1", "::1"]

重启 elasticsearch

1
sudo service elasticsearch restart

安装 ik 中文分词插件

打开 /usr/share/elasticsearch/plugins

创建 文件夹

1
sudo mkdir ik

将下载的 https://github.com/medcl/elasticsearch-ana… 解压到 ik 文件夹中

1
unzip  xxx.zip

重启服务

1
sudo service elasticsearch restart

安装 kibana

kibana 是一款界面管理工具 官方出品的

laravel 安装全文搜索

1
2
3
composer require tamayo/laravel-scout-elastic 
composer require laravel/scout //版本可能不兼容 具体看composer中的兼容版本
php artisan vendor:publish //选择其中的配置文件发布

发布配置文件后需要对配置文件进行更改

1
'driver' => env('SCOUT_DRIVER', 'algolia'), //在env 中 添加   elasticsearch

在 scount.php 中添加

1
2
3
4
'elasticsearch' => [    
'index' => env('ELASTICSEARCH_INDEX', 'products'),
'hosts' => [ env('ELASTICSEARCH_HOST', 'http://localhost'), ]
]

https://learnku.com/articles/42730

你的善良,必须带点锋芒,否则等于零。

概述

空格:$('parent childchild')表示获取parent下的所有的childchild节点

大于号:$('parent > childchild')表示获取parent下的所有下一级childchild

加号:$('pre + nextbrother')表示获得pre节点的下一个兄弟节点,相当于next()方法

波浪号:$('pre ~ brother')表示获取pre节点的后面的所有兄弟节点,相当于nextAll()方法

详细解读

1
2
3
4
5
6
7
8
9
10
11
12
13
14
15
16
17
18
19
20
21
22
<div id="imgs_box">
<ul class="play_imgs_width imgs_source">
<li><a href="javascript:;"></a></li>
</ul>
<ul class="imgs_buttons play_imgs_width">
<li><a href="" class="buttons_ahover">1</a></li>
<li><a href="" class="buttons_default">2</a></li>
<li><a href="" class="buttons_default">3</a></li>
</ul>
<ul class="test">
<li>
<ul class="test_first_child">
<li></li>
<li></li>
<li></li>
<li></li>
</ul>
</li>
</ul>
</div>

空格的使用

如果要获取imgs_box中的所有a标签,可以使用空格,代码如下

1
$('#imgs_box a').length;  // 6

大于号的使用

如果要imgs_box中下一级的所有ul元素,不包含类为test_first_child的元素,可以使用如下代码

1
$('#imgs_box > ul').length;

加号的使用

如果想获取类为imgs_source元素的相邻的下一个元素,可以使用加号

1
$('.imgs_source + ul').css("color","red");

波浪号的使用

如果想获取类为 imgs_source元素所有的同级元素,可以使用波浪号~

1
$('.imgs_source ~ ul').css("color","red");

别忘了,你也曾是第一名

jQuery获取子元素的方法有2种,分别是children()方法和find()方法。

1.children()方法:获取该元素下的直接子集元素

2.find()方法:获取该元素下的所有子集元素

1
2
3
4
5
6
7
8
9
10
11
12
13
14
15
16
17
18
19
20
21
22
23
<ul id="ul">
<li>
list1
<ul>
<li>list1-1</li>
<li>list1-2</li>
</ul>
</li>
<li>
list2
<ul>
<li>list2-1</li>
<li>list2-2</li>
</ul>
</li>
<li>
list3
<ul>
<li>list3-1</li>
<li>list3-2</li>
</ul>
</li>
</ul>

3、children()方法获取最外层ul下面直接子集元素li:$("#ul").children("li")
需要注意的是,如果li元素下还有li元素,children()方法将不会被获取。我们可以用length来测试获取的个数“$("#ul").children("li").length”,最后输出结果为3

4、find()方法获取ul下所有元素li:$("#ul").find("li")

需要注意的是,find()方法会无限循环查找ul标签节点下的li,一直找到没有为止,用length来测试获取个数$("#ul").find("li").length,最后输出结果为9

5、childrenfind的区别:children只会查找直接子集,而find会跨越层级查找,一直找到没有为止。